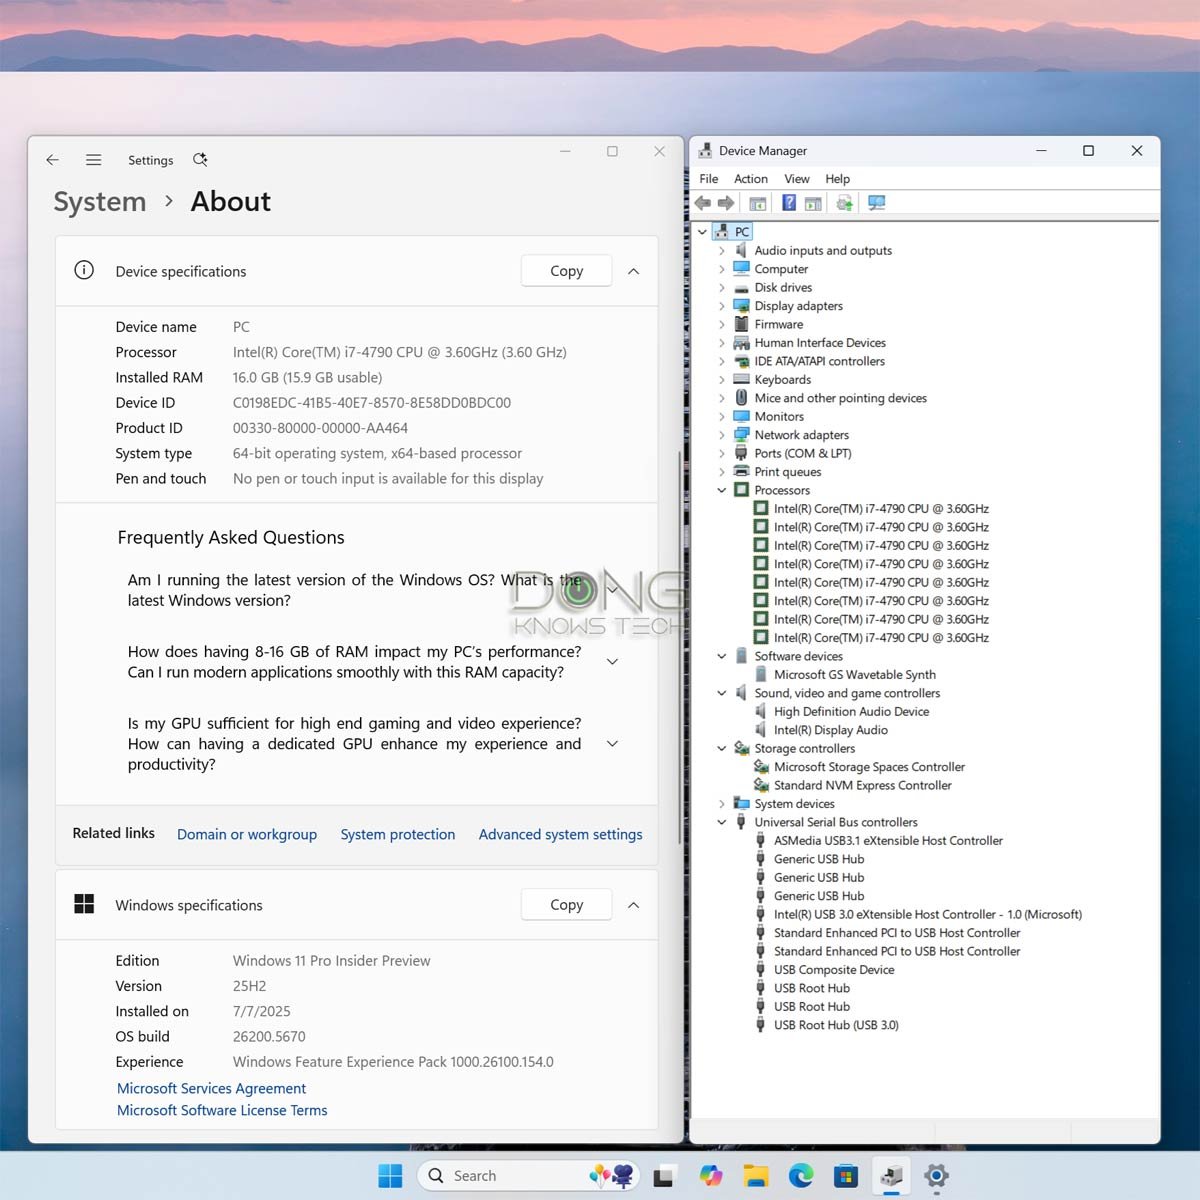
This post will help you upgrade any Windows 10 computer, including those that don’t meet the hardware requirements—without TPM 2.0, lack Secure Boot, or run on an unsupported CPU—to any release of Windows 11, including version 24H2 and the latest version 25H2 (still in Preview stage).
There’s no need for a third-party tool or finicky registry tweak if you use the ISO installer files I provide below. I’ll also point you in the right direction to upgrade your computer using an original installer ISO downloaded directly from Microsoft.
Dong’s note: I first published this piece on October 21, 2021, and have updated it multiple times as Windows 11 evolved, with the latest update done on July 24, 2025, to add support for version 25H2 (Preview). As usual, please read the post carefully.
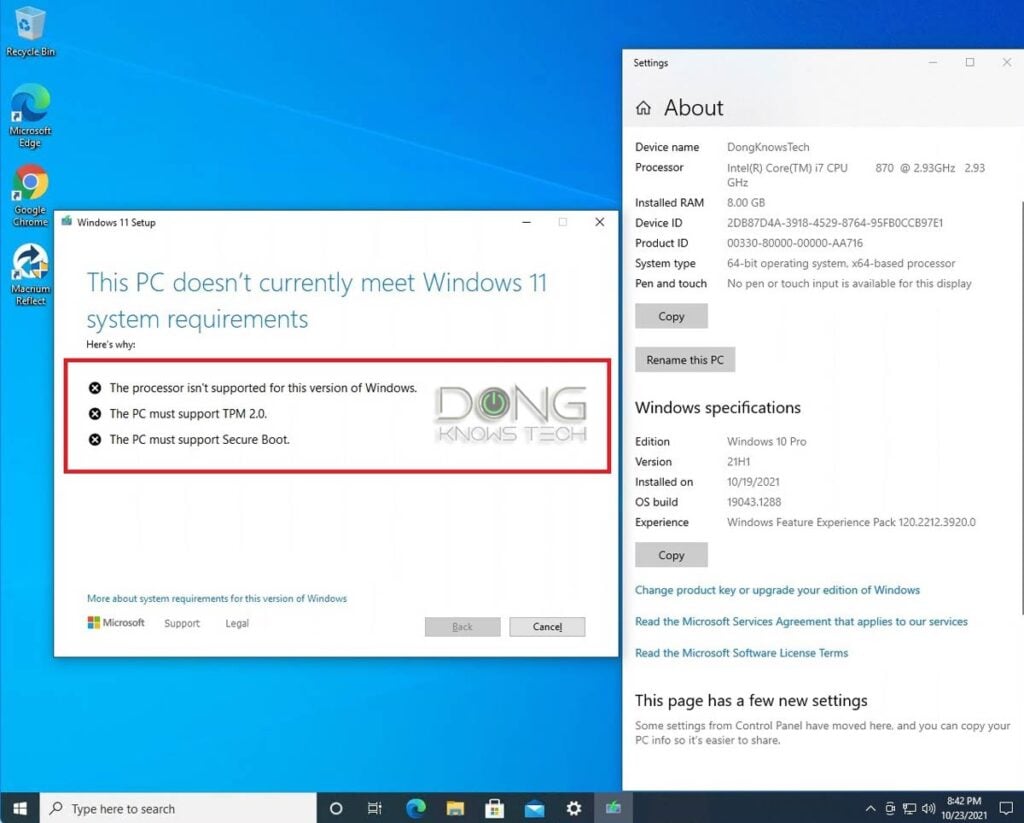

Windows 11 is slated to replace Windows 10 entirely in October 2025—we have no choice.
One of the controversies about Windows 11 is its ridiculous hardware requirements. Among other things, your computer must support Secure Boot and feature a Trusted Platform Module (TPM) 2.0. Neither is essential to the computer’s day-to-day operation—prior to Windows 11, they were often disabled by default on many machines that supported them.
Here’s the truth:
- Windows 11 versions 21H2, 22H2, and 24H2 can run well on any computer that’s capable of running Windows 10 64-bit.
- Windows 11 versions 24H2 and 25H2 indeed require the SSE4.2 instruction called POPCNT. However, this is a common feature supported in all AMD and Intel CPUs released since 2008. (Computers with older CPUs won’t be able to boot into Windows 11 24H2 (or later) after the upgrade.)
- Installing Windows 11 on your current computers will prolong its life, save you hundreds, if not thousands, of dollars, and spare mankind from unnecessary e-waste.
There are two reliable methods to upgrade an unqualified computer running Windows 10 to Windows 11 that I’ve used for years.
The first method is via customized ISO files, as shown below. They work the same on unsupported devices as those you download directly from Microsoft on supported hardware.
Note: For an in-place upgrade with software and data intact, the computer must use the same default display language as the one used in these ISOs, which is English (US).
How I create customized Windows 11 ISOs for unsupported computers
Windows 11’s hardware requirements are artificial—they are not necessary.
To remove these requirements:
- Extract a Windows 11 ISO file into a folder and identify the files designed to check the hardware requirements at the beginning of the setup process. These files vary from one release to another. (Unfortunately, it requires a “particular set of skills” and a good amount of patience to figure out these files. There are no straightforward 1-2-3 steps to get that done—it took me many hours of trial and error.)
- Remove these files and replace them with those that don’t enforce the hardware requirements available in previous versions of Windows.
- Rebuild the ISO image.
The process only changes the files used during the hardware checkup and setup portions. It does not alter the content of any file of the operating system itself and will not affect the actual upgrade process or how Windows works once installed.
The second method is more organic and suitable for those who want to get the job done using the original ISO from Microsoft or build a fresh image for multiple-computer deployment.
With that, let’s start with the in-place upgrade method. Here are the detailed A-B-C steps
A. Prepare the computer
As a rule, back up your system beforehand.
Note that the walkaround/ISOs provided here only remove Windows 11’s hardware requirements. It doesn’t do anything else and won’t fix any problems, including cryptic error messages you might encounter.
For the upgrade to work, your computer must be in a good, error-free state. Even on supported hardware, many issues can prevent Windows from being upgraded from one release to another. That’s just the nature of the Windows operating system.
Change your machine to 64-bit and consider English (US) as the display language
As mentioned above, there are two conditions for a successful Windows 11 upgrade:
- The computer must currently run Windows 64-bit (it’s likely already the case).
- The computer needs to use English (US) as the display language before it can be upgraded using any of the ISO files below, with the option to retain your existing programs and settings. Or, you can choose to install Windows 11 as a fresh installation.
To convert from 32-bit to 64-bit: You need to back up your data and install Windows 10 from scratch. This post on the topic will help.
To convert a non-English (US) machine to English (US) and vice versa:
- Click on Start -> Settings -> Time & language -> Language & region.
- Pick/add English (US) as the Windows display language. (Repeat this step after the upgrade to use the display language of your liking.)
To be sure, check and, if necessary, manually change the values of Default and InstallLanguage strings in the following registry key to 0409:
Computer\HKEY_LOCAL_MACHINE\SYSTEM\CurrentControlSet\Control\Nls\Language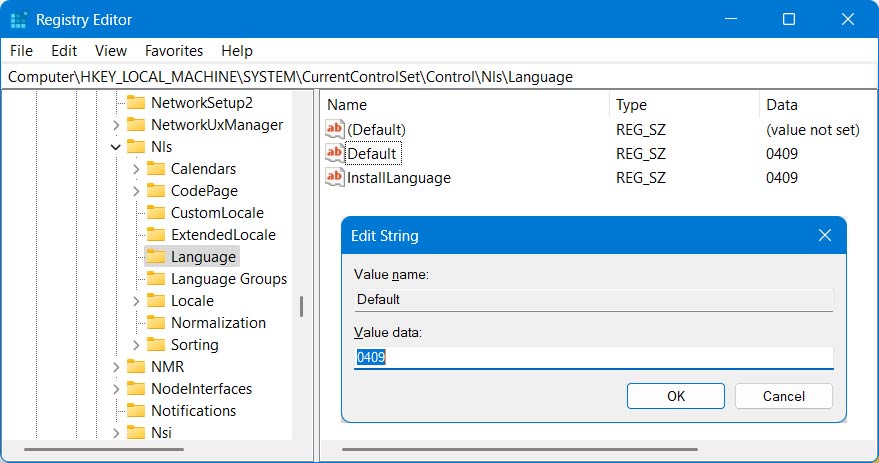

B. Download Windows 11 installer ISO
You can choose one of the customized Windows 11 installer ISO files below. Each represents a Windows 11 release. The two digits before ‘H’ indicate the release year.
This file will upgrade any computer running Windows 10 or Windows 11 21H2 to Windows 11 22H2. ISO (for unsupported hadware) download options:
- Free download (1): Go here!
- Fast download via Ko-fi page (for those with a monthly recurring donation plan) (2)
- Fast download for subscribers:
to view the download link!
This file will upgrade any computer running Windows 10 or Windows 11 (21H2 or 22H2) to Windows 11 23H2. ISO (for unsupported hadware) download options:
- Free download (1): Go here!
- Fast download via Ko-fi page (for those with a monthly recurring donation plan) (2)
- Fast download for subscribers:
to view the download link!
This file will upgrade any computer with a 2008 or newer CPU running Windows 10 or Windows 11 (21H2, 22H2, or 23H2) to Windows 11 24H2. ISO (for unsupported hadware) download options:
- Free download (1): Go here!
- Fast download via Ko-fi page (for those with a monthly recurring donation plan) (2)
- Fast download for subscribers:
to view the download link!
This is the first Windows 11 version that supports Wi-Fi 7’s MLO feature.
This file will upgrade any computer with a 2008 or newer CPU running Windows 10 or Windows 11 (21H2, 22H2, or 23H2) to Windows 11 25H2. ISO (for unsupported hadware) download options:
- Free download: Currently unavailable.
- Fast download via Ko-fi page (for those with a monthly recurring donation plan) (2)
- Fast download for subscribers:
to view the download link!
Note: This is the Insider Preview version that can be upgraded via Windows Update to the final release when avaible. For now, only a clean installation is available when upgrading from Windows 11 version 24H2. I’m working on overcoming this, hopefully by the time the final release is avaiable.
Save the ISO file in a known location, such as the computer’s desktop.
C. Perform the in-place upgrade or clean installation
The in-place upgrade is the same on all computers. Note that you can only upgrade to a newer version, such as from version 22H2 to 23H2 or 24H2. Downgrading will result in the loss of all programs and settings (clean installation).
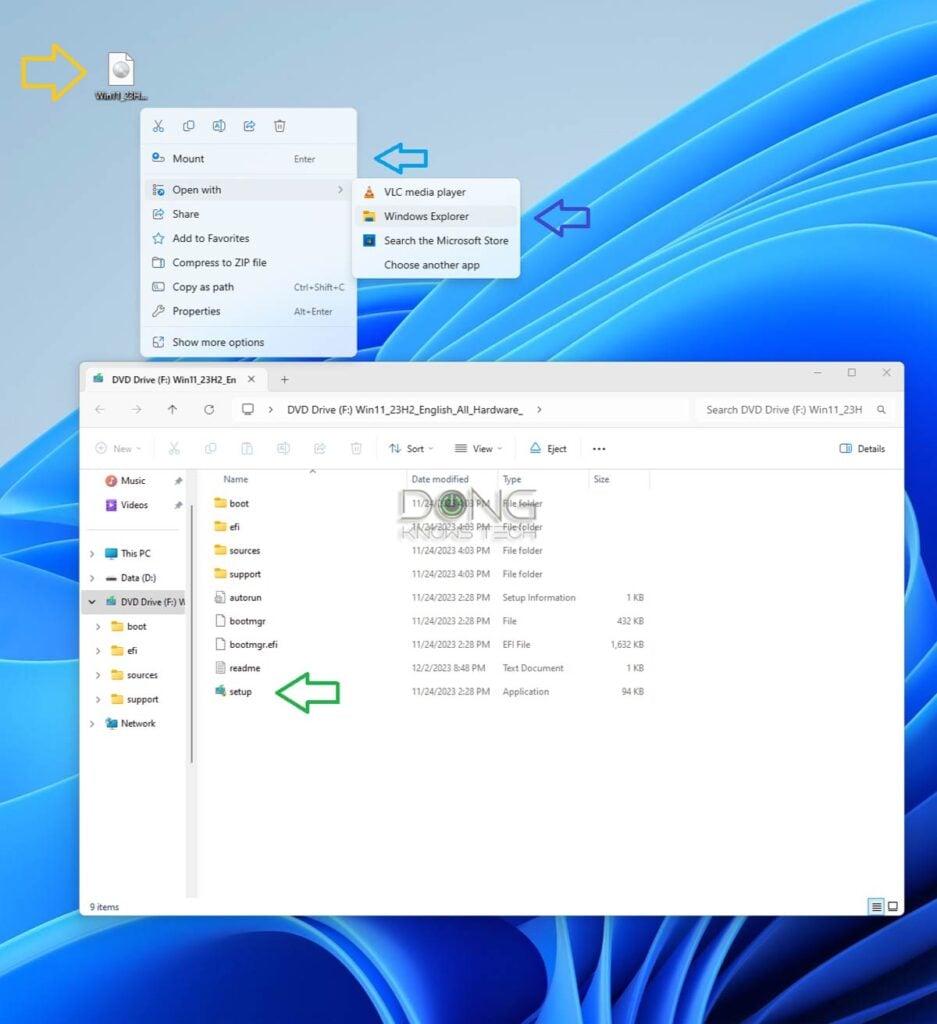

Open the downloaded ISO image file using Windows Explorer. In most cases, this means double-clicking on the file; however, if you use a third-party ISO handler on your computer, right-click the file and choose “Mount” or “Open with Windows Explorer.” If you open the file with any third-party software, the installation might fail.
Once mounted, the ISO will appear as an optical (DVD) drive with its content within the window, as shown in the screenshot above. Now, double-click the Setup file to start the upgrade process.
You’ll be presented with a few steps:
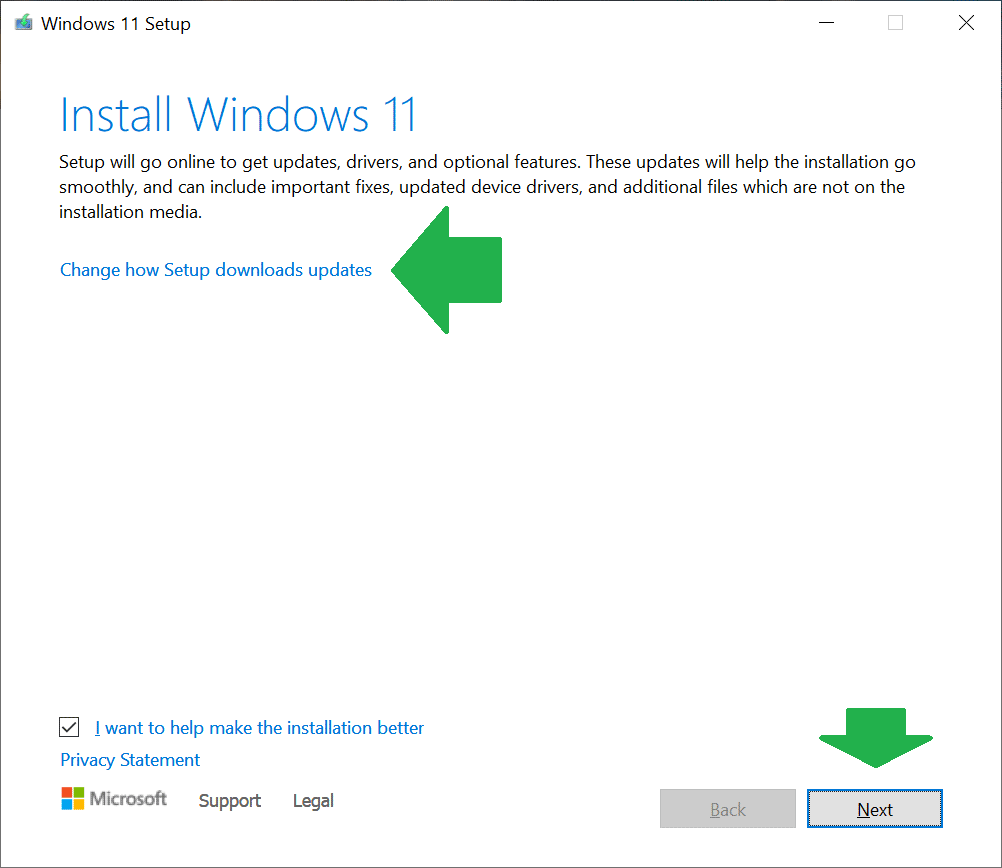
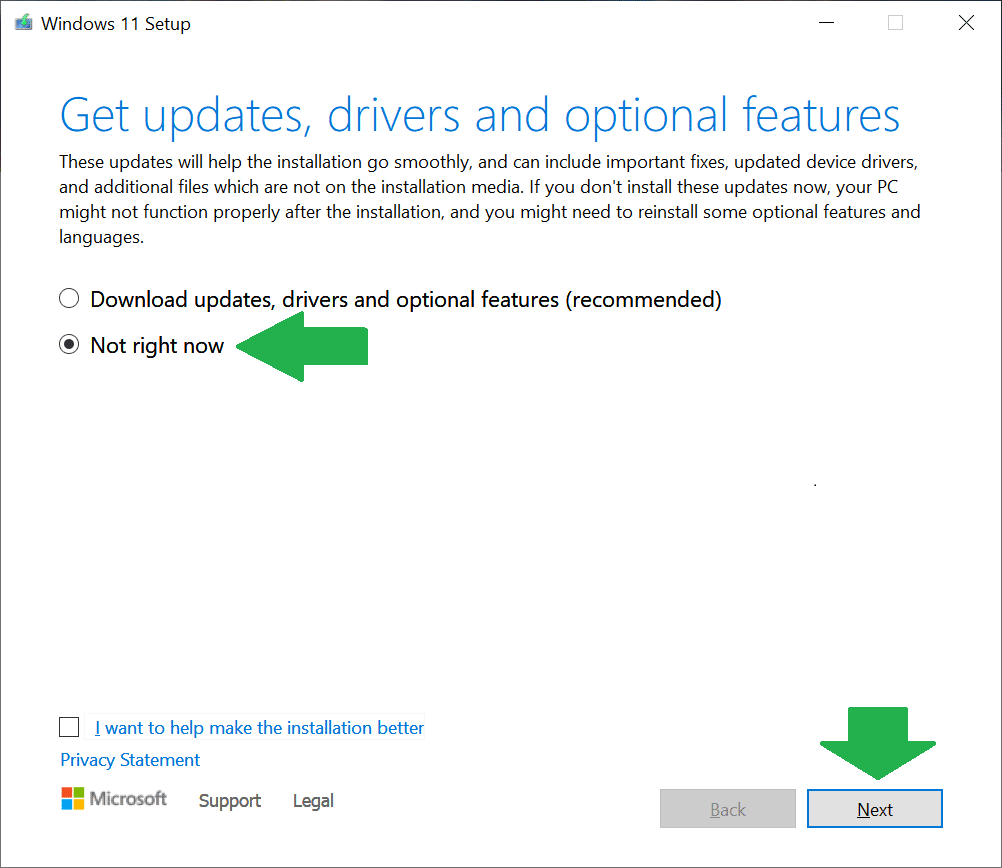
- Important: Change how Setup downloads updates: To be sure, opt not to download the updates, which can be handled via Windows Update later. The updates can take a long time and often include a new tool to reinforce the hardware requirements.
- Accept the license terms: We have no choice.
- Choose what to keep: For an in-place upgrade, choose to keep everything—the default option. The other options, including the one to keep nothing (a.k.a Clean Install), can be applicable when:
- The computer currently has software issues that prevent it from an in-place upgrade, or you just want a “new” computer.
- You want to go back to an older Windows 11 release, such as from version 23H2 to 22H2.
- Your computer currently runs a 32-bit edition of Windows 10 or a non-English version of the OS, and you don’t want to convert it to the 64-bit English version first.
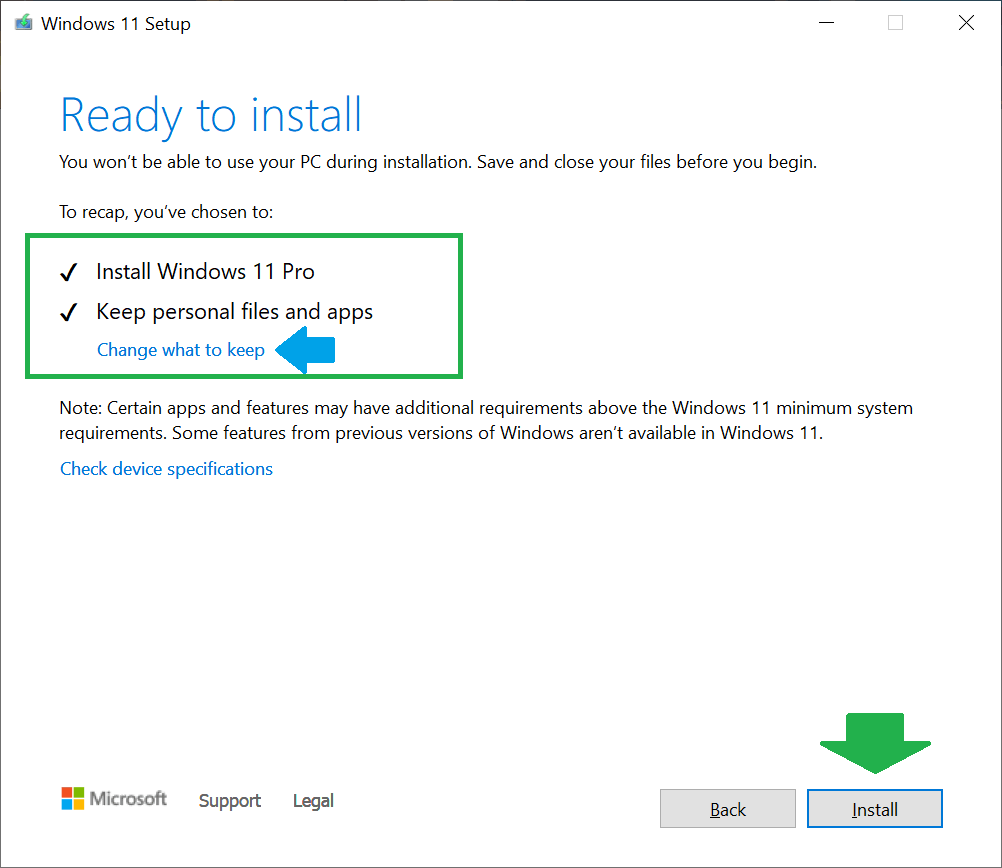
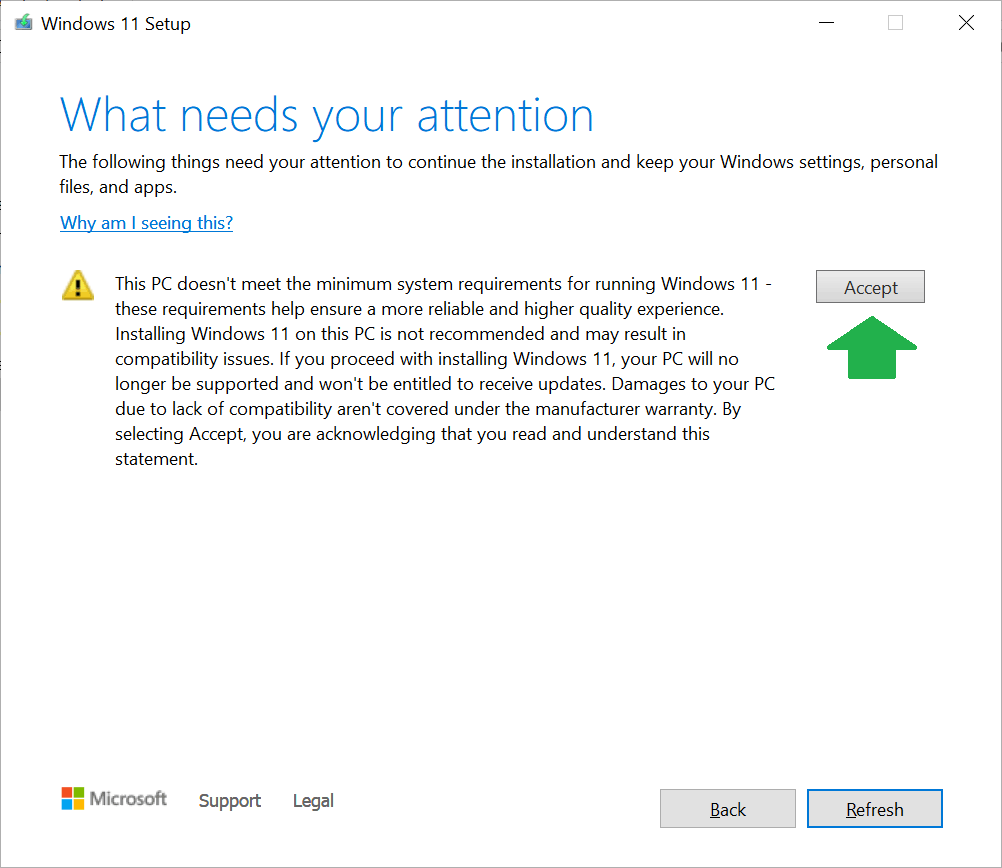
And that’s it. The process will continue like a typical Windows feature upgrade, which will require the computer to restart several times. After about 30 minutes or so, depending on your computer’s speed, you’ll find yourself with a “new” computer running the version of Windows 11 you selected.
How to upgrade unqualified hardware to Windows 11 using an original ISO file
It’s possible to upgrade an unsupported computer to any version of Windows 11 using the original ISO files. Generally, the latest version is available to download from Microsoft.
In this case, you need temporarily supported hardware, namely a computer that meets all the requirements of Windows 11. The only condition is that the unsupported computer uses the same boot method and partition type as the supported one. This is likely already the case.
After that, here are the general directions:
- If you want to upgrade a computer running Windows 10 or an older version of Windows 11:
- Move the internal boot drive of the unsupported computer to the supported one. When you boot up, the machine will go through a short process of “getting devices ready,” and you’ll be able to log in. (Since this is temporary, there’s no need to reactivate Windows if prompted.)
- Upgrade the supported computer (running the internal drive of the unsupported one) to the Windows 11 version of your choosing. The process will go through without issues since the hardware meets the requirements.
- Once the upgrade is complete, return the internal drive to the unsupported computer. Mission accomplished.
- You can do a fresh installation if you don’t need to keep existing data. In this case:
- Install the Windows 11 version of your choice on the supported computer.
- Make an image using drive cloning software—I’d recommend Macrium Reflect.
- Restore that image on an internal drive, then use that drive on the unsupported hardware (or any computer that you’d like to have a fresh copy of Windows 11 on)—make sure the hardware itself has a digital Windows 10 or 11 license tied to it, or you’ll have to activate it anew. Mission accomplished.
The result
After the upgrade, you’ll also find that Windows 11 is already activated—assuming you’re using a legit older version, or you’ll need to get a license and activate it at some point—and all existing software remains the same.
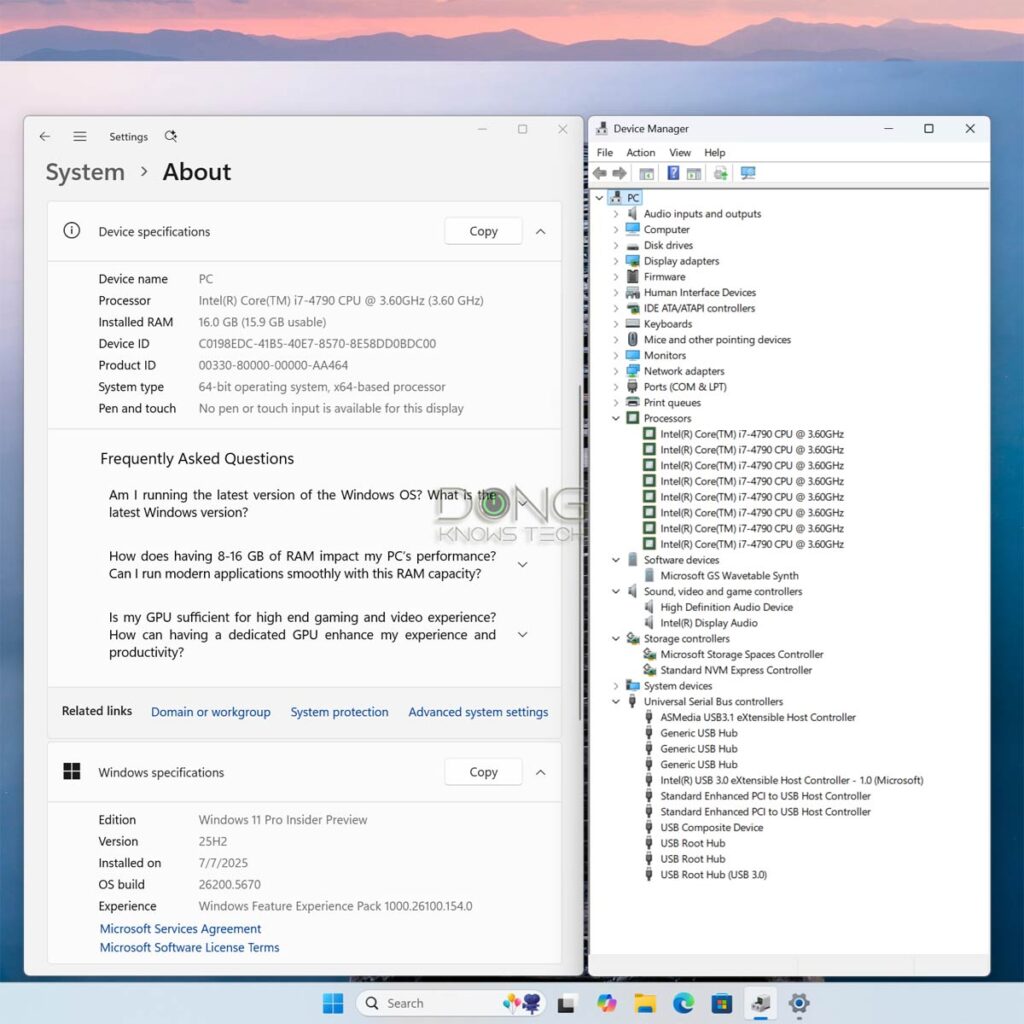

Windows 11 will work on old hardware just like it does on newer and qualified hardware. I’ve used it on multiple unsupported machines for years without any issues.
Once upgraded to Windows 11, you can continue to update the machine with regular security and improvement patches to the latest build of the release.
The takeaway
Again, if your current computer runs Windows 10, it’s highly likely that it can run the latest version of Windows 11.
So, if you can install it the “official” way, great! If not, there’s this way. Alternatively, you can purchase a new computer and install Windows 11 on it. Chances are, it already comes with Windows 11, which is the way Microsoft (and its hardware partners) would prefer you to do it, and I have no issue with that.
However, if your hardware is still in good condition, it’s always better for the environment and our wallets not to consume more than necessary.
